day-04-Terraform


Day-04
Terraform Terraform Variable and Datasources
-> Create a terraform-key in AWS ec2 key-pairs which we will reference in our EC2 instance.
Step-01: Introduction
Terraform Concepts;
-> terraform Input variables
-> Terraform Datasources
-> Terraform Output Values
What are we Going to Learn?
Learn about Terraform
Input VariablebasicsAWS Region
Instance Type
Key Name
Define
Security Groupsand Associate them as alist itemto AWS EC2 Instancevpc-ssh
vpc-web
Learn about Terraform
Output ValuesPublic IP
Public DNS
Get the latest EC2 AMI ID using
Terraform Datasourcesconceptwe are also going to use the existing EC2 Key pair
terraform-keyUse all the above to create an EC2 Instance in Default VPC
Step-02: c2-variables.tf - Define Input Variables in Terraform
# AWS Region

Variable "aws_region" {
  description = "Region in which AWS resources to be created"
  type= string
  default = "ap-northeast-1"
}

# AWS EC2 Instance Type
Variable "instance_type" {
   description = "EC2 instance type"
   type = string
   default = "t3.micro"
}

# AWS EC2 Instance Key-pair, *terraform-key* contains the newly generated public-key content
variable "instance_keypair" {
   description = "AWS EC2 key-pair that needs to be associated with EC2 Instance"
   type= string
   default = "terraform-key"
}
- Reference the variables in respective .tf files
# c1-versions.tf
region = var.aws_region
#c5-ec2instance.tf
instance_type = var.instance_type key_name = var.instance_keypair
Step-03: c3-ec2Securitygroups.tf - Define Security Group Resources in Terraform
# Create Security Group - SSH Traffic
resource "aws_security_group" "vpc-ssh" {
  name = "vpc-ssh"
  description = "Dev VPC SSH"
  ingress {
    description = "Allow port 22"
    from_port = 22
    to_port = 22
    protocol = "tcp"
    cidr_blocks = ["0:.0.0.0/0"]
  }
  egress {
    description = "Allow all ip and ports outbound"
    from_port = 0
    to_port = 0
    protocol = "-1"
    cidr_blocks = ["0.0.0.0/0"]
 }
}

# Create Security Group - Web Traffic
resource "aws_security_group" "vpc-web" {
  name = "vpc-ssh"
  description = "Dev VPC SSH"
  ingress {
    description = "Allow port 80"
    from_port = 80
    to_port = 80
    protocol = "tcp"
    cidr_blocks = ["0:.0.0.0/0"]
}

  ingress {
    description = "Allow port 443"
    from_port = 443
    to_port = 443
    protocol = "tcp"
    cidr_blocks = ["0:.0.0.0/0"]
}
   egress {
    description = "Allow all ip and ports outbound"
    from_port = 0
    to_port = 0
    protocol = "-1"
    cidr_blocks = ["0.0.0.0/0"]
  }
}
In the above code, we are repeating the Resource Block to open every port, like we have a block for port 22 to open and 80 & 443. which is similar to looping.
To overcome this type of repetition or looping of code (it makes code complex, having a big code) we learn about the concept of Terraform Dynamic Block
Terraform Dynamic Block: Terraform dynamic blocks are a way to dynamically generate Terraform configuration code based on the values of variables or maps. Dynamic blocks enable you to generate Terraform resources based on input values and make your configurations more flexible, reusable, and easier to manage.
Let's re-write the above code of Security Groups using Dynamic Block
resource "aws_security_group" "allow_tls" {
  name        = "allow_tls"
  description = "Allow TLS inbound traffic"

  dynamic "ingress" {
    for_each = [22, 80, 443, 3306]
    iterator = port
    content {
      description = "TLS from VPC"
      from_port   = port.value
      to_port     = port.value
      protocol    = "tcp"
      cidr_blocks = ["0.0.0.0/0"]
    }
  }
  egress {
    from_port   = 0
    to_port     = 0
    protocol    = "-1"
    cidr_blocks = ["0.0.0.0/0"]
  }

  tags = {
    Name = "allow_tls"
  }
}

#here we have opened four ports, in the same you can add 'n' number of ports to open
- Reference the Security groups in
c5-ec2instance.tffile as list item
# list item
#this is for the first code of Security Group Codevpc_security_group_ids= [aws_security_group.vpc-ssh.id, aws_security_group.vpc-web.id] or
#this is for the second code of security Group code using dynamic block onevpc_security_group_ids = [aws_security_group.allow_tls.id]
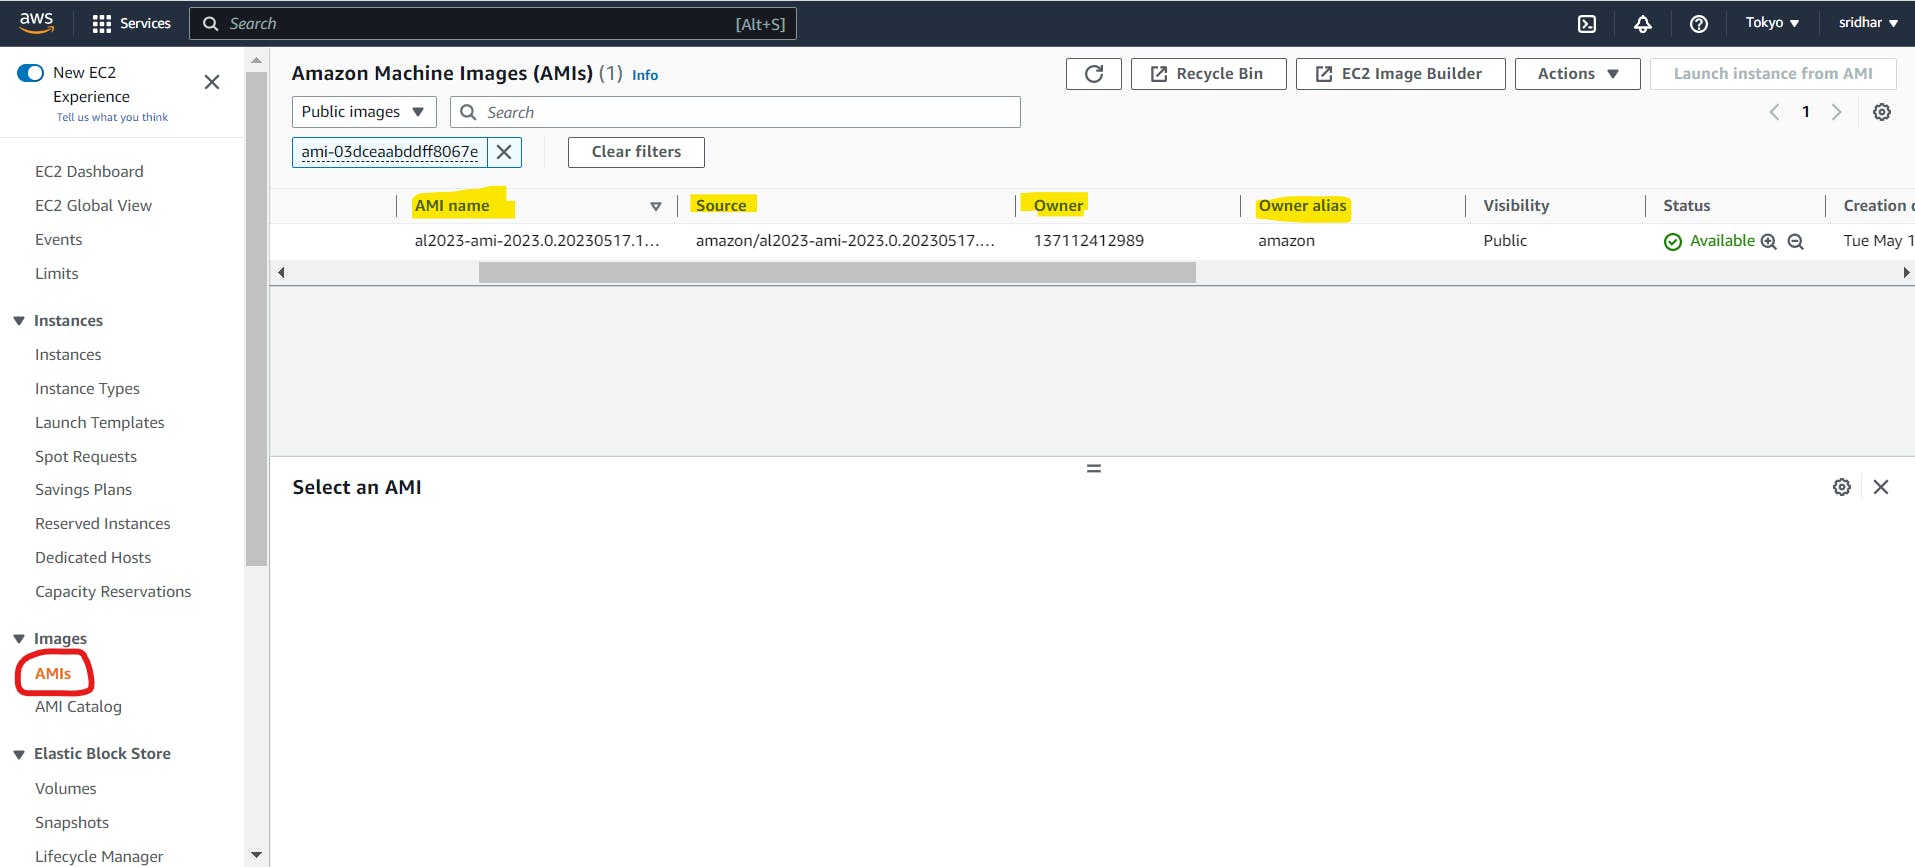
Step-04: c4-ami-datasource.tf - Define Get latest AMI ID for Amazon Linux2 OS
data "aws_ami" "amazonlinux" {
  most_recent = true

  owners = ["137112412989"]

  filter {
    name   = "name"
    values = ["al2023-ami-2023.0.*-kernel-6.1-x86_64"]
  }

  filter {
    name   = "root-device-type"
    values = ["ebs"]
  }


  filter {
    name   = "virtualization-type"
    values = ["hvm"]
  }
}
Note : Find the values of above attributes like 'owners' , 'name' frm the below screenshot

- Reference datasource to get the latest AMI ID
ami= data.aws_ami.amazonlinux.id
Step-05: c5-ec2instance.tf - Define EC2 Instance resource
# EC2 Instance
resource "aws_instance" "myec2vm" {
  ami = data.aws_ami.amazonlinux.id
  instance_type = var.instance_type
  user_data = file("${path.module}/script.sh")
  key_name = var.instance_keypair
  vpc_security_group_ids = [aws_security_group.vpc-ssh.id, aws_security_group.vpc-web.id]
# vpc_security_group_ids = [aws_security_group.allow_tls.id]
# use any one of the security group Argument. Here, we have used first one
  tags = {
    "name" = "EC2 demo 2"
  }
}
Step-06: c6-outputs.tf - Define Output Values
# Terraform Output Values
output "instance_publicip" {
  description = "EC2 Instance Public IP"
  value = aws_instance.myec2vm.public_ip
}

 output "instance_publicDNS" {
   description = "EC2 instance public DNS"
   value = aws_instance.myec2vm.public_dns
}
Step-07: Execute Terraform Commands
terraform init -> terraform validate -> terraform plan -> terraform apply or terraform apply --auto-approve
when you give terraform plan
Observations:
-> Verify the latest AMI ID picked and displayed in the plan
-> Verify the number of resources that going to get created
-> Verify the Variable replacements worked as expected
when you give terraform apply Observations:
-> Create resources on cloud
-> created terraform.tfstate file when you run the terraform apply command
-> Verify the EC2 Instance AMI ID which got Created
Step-08: Acess Application
# Access the nginx in the browserhttp://<PUBLIC-IP>
Step-09: Clean-UP
terraform destroyrm -rf .terraform*rm -rf terraform.tfstate*